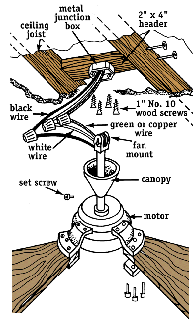
 General Considerations:
- An easy-to-install ceiling fan can make a real difference in your home’s climate-both cooling and heating-at a far lower cost and operating expense than almost any other item.
- The installation begins with choosing where the fan should be located. In almost all homes, the fan is installed in the center of the room, replacing a central light fixture. This spot provides a smooth air flow to most of the room.
- Since a fan draws about the same power as a ceiling fixture, the electrical circuit shouldn’t be overloaded. But if your fan includes lights, be sure the circuit it’s on has enough extra capacity to handle the load. If not, you must run a new circuit with a new circuit breaker from the house main service panel or subpanel to the fan.
- If there is no central light fixture, you’ll have to create a place to hang the ceiling fan. Then, you’ll need to bring electrical power to it. You can tap into an existing circuit to do this.
For home improvement advice, visit JS West Lumber & Ace Hardware Sonora, Ca. or visit www.acehardware.com and click on the Answers@Ace icon. Answers@Ace is an online resource with information for do-it-yourselfers about hardware and home improvement projects. The Everyday Projects section has pictures and detailed, step-by-step instructions for this and many more home improvement projects.
To speak to an Ace Hardware advisor in Sonora call: 209 532 7446.
