 Warm weather months are a great time to treat the exterior of your home to a new coat of paint. It will give your home that coveted curb appeal and attractiveness, and also serve as a protective ‘shield’ from the deteriorating effects of wind, water, sun and mildew.
Do-it-yourselfers (DIYers) recognize painting as one of the most economical ways to make a noticeable difference outside their homes. In fact, the ‘Why Americans DIY’ Study of 1,000 American homeowners commissioned by Ace Hardware reveals that nine out of 10 homeowners choose to DIY to save money rather than pay someone to do the job.
Following are some guidelines on how to freshen up the façade of your home.
Make Preparation Your Priority –
Your paint job – how it looks as well as how long it lasts – hinges largely on your preparation technique. After all, 90 percent of the task depends on proper prep work.
First, have the tools you will need at the ready: Various sizes of paint brushes and rollers, sandpaper, scrapers, exterior-grade caulk and putty, masking tape and a drop cloth or two to protect shrubbery, walkways and cars. It may also be beneficial to have protective eyeglasses or a face mask on hand, as spattered paint can cause serious damage to the eyes.
Of course, you will also need a sturdy ladder to help you reach high spots. Another useful gadget found is a pot hook (about $3), which will allow you to hang the paint bucket from your ladder for easy access.
The first major step in the preparation is water-blasting the siding of your home to get rid of debris. Use either a normal hose with a high-powered spray attachment or consider renting or purchasing a pressure washer – a simple electric model will run you between $100 and $150. Trisodium phosphate (TSP) is a safe cleaning agent to use. To remove and prevent mildew, use a detergent with mildewcide or a mixture of one quart of household bleach in three quarts of water.
If your home was built before 1978, take caution before cleaning or removing paint because it may contain lead. To determine this, purchase a lead paint test (about $11) or have a professional test it for you.
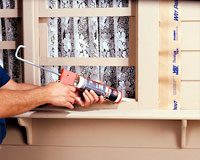
Once the surface area has been power washed, concentrate on damaged areas. Scrape off flaking paint, repair surface flaws, remove old caulk and re-putty windows. Lastly, sand over and prime spots where repairs have been made to ensure a smooth area for the paint to adhere to.
The next step is priming. A paint primer seals porous surface materials so the topcoat won’t soak in and dry unevenly, and it helps prevent peeling, rusting and bleed-through. Your local Ace store will be able to point out the pros and cons of choosing either an exterior latex or oil-based primer.
Once everything is cleaned, you will need to figure out how much paint you’ll need, and what kind to use. A good rule of thumb for estimating is multiplying the length of each wall by its height, then add another 30 percent to be safe. Typically, one gallon of paint will cover 200 to 350 square feet. Also, buy more than you think you will need – you can always use the extra paint to touch-up trim.
Above all, invest in the best paint you can afford. Doing so will actually save you money in the long run because high-quality paint truly outlasts lower-quality brands.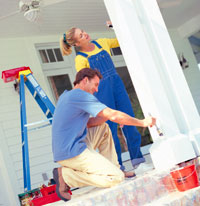 Application is Easy –
Once you’ve chosen the color and type of paint to use, you’ll need to decide on how you’ll apply it. This is actually less challenging than the preparation. Brushes and rollers will assist you best in getting into cracks and crevices, but a paint sprayer is the fastest way to get the job done. Opt for the technique you feel most comfortable doing.
Follow the ‘top-down’ rule – work from the top down to get the most even coverage, and finish with the trim. Also, take care to paint into already wet paint, and not away from wet paint, making sure that there are no noticeable overlapping marks or shading nuances.
If you read through this and decide you still need some help, don’t despair – ask the helpful folks at your neighborhood Ace store! And remember, if you have home improvement questions and need a little advice, send me an email at asklou@acehardware.com – I’d be glad to help! Lou.
For home improvement advice, visit JS West Lumber & Ace Hardware Sonora, Ca. or visit www.acehardware.com and click on the Answers@Ace icon. Answers@Ace is an online resource with information for do-it-yourselfers about hardware and home improvement projects. The Everyday Projects section has pictures and detailed, step-by-step instructions for this and many more home improvement projects.
To speak to an Ace Hardware advisor in Sonora call: 209 532 7446.