Begin Your Installation- Ceiling Fans Part 2
- Start your installation by turning off the power to the light’s circuit breaker or fuse. Only then should you remove the light fixture.
- If there is no central light fixture, snap diagonal chalk lines from opposite corners of the room to find its center. Determine whether the lines cross exactly below a ceiling joist. If they do, move aside just far enough between joists to let you fasten the side of the fan’s new junction box directly to the joist.
- Cut a hole large enough for the junction box to be slipped in. If it’s next to the joist, drill holes in its side and screw it to the joist.
- Installation between joists is OK, too. Fasten the box to a 2×4 header nailed between the joists. Sometimes, you can insert a 2×4 header through the junction box’s hole, nailing it to each joist. If not, you may need to open a larger access hole. Then, patch the hole to close it again. (see image above for a typical fan mounting where there’s access above the joists for header-nailing.)
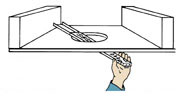
- You may choose to use a patented fan support unit designed to be inserted through the normal junction box hole to save you from opening a hole in the ceiling (see image).
- Use only a metal junction box to support a ceiling fan-never hang the fan from a plastic box. Depending on the brand, style, and size of your ceiling fan-and your electrical code – you may use a 4′ or 3′ octagonal junction box. (Some local codes don’t permit the use of 3′ boxes.)
- The heaviest fan that should be supported by an outlet box is 35 lbs.. If it weighs more, the building structure must support it.
![]()
- Whatever you do, make sure the junction box is supported well enough to hold at least 50 lbs. That’s the weight of an average ceiling fan. Also, your mounting must be able to withstand vibration while the fan is running. Even a well-balanced fan creates some vibration when it runs.
- You’ll use a special beam mount when mounting a fan to a beamed ceiling. Use one kind for a horizontal beam, another for a pitched beam (see image). You may need an extender to lower the fan to the proper level.
- Fan-mounting is particularly important because any failure to make things secure could allow your fan to fall from the ceiling.

For home improvement advice, visit JS West Lumber & Ace Hardware Sonora, Ca. or visit www.acehardware.com and click on the Answers@Ace icon. Answers@Ace is an online resource with information for do-it-yourselfers about hardware and home improvement projects. The Everyday Projects section has pictures and detailed, step-by-step instructions for this and many more home improvement projects.
To speak to an Ace Hardware advisor in Sonora call: 209 532 7446.