Mounting Fan To The Box- Part 5
- Install the hanger bracket on the box with screws and lock washers. If no lock washers are supplied, get some-they prevent fan vibration from loosening the screws over time.
- The hanger bracket may accept either a half-ball hanger or a hook-type hanger, depending on which kind your fan uses. Either way, the hanger is carefully slipped into the bracket.
- Next, the unit is wired, and the ceiling cover is slipped up to its full height and tightened in place.
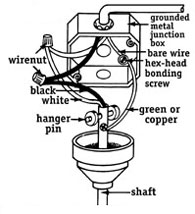
- Be sure to connect the black house wires to the black fan wires, and the white house wires to the white fan wires.
- The fan should be electrically grounded to both the metal box and the fan (see image). The grounding wires will be either green or bare copper. A green grounding pigtail attached to the box by a bonding screw will make your work easier. Wirenut the ground wires from the box, the fan and the power supply together.
- If the fan wobbles when it runs, its blades may be unbalanced. To correct this, try interchanging two adjacent blades. If that doesn’t work, take all the blades off and weigh each one on a food or postal scale. If any is underweight, tape a soft object such as a pencil eraser or modeling clay to the top center of the blade, making its weight the same as the others. Fan balancing kits with detailed instructions are also available. Reinstall the blades and the fan should run smoothly.
For home improvement advice, visit JS West Lumber & Ace Hardware Sonora, Ca. or visit www.acehardware.com and click on the Answers@Ace icon. Answers@Ace is an online resource with information for do-it-yourselfers about hardware and home improvement projects. The Everyday Projects section has pictures and detailed, step-by-step instructions for this and many more home improvement projects.
To speak to an Ace Hardware advisor in Sonora call: 209 532 7446.