Underground Installation form the House- Part 3 of 7
- Before you begin, shut off the electrical current at the main switch box.
- For an underground wiring installation, mount a breaker or a fuse box in a location similar to that illustrated in this image. The breaker box should start the installation no matter what type of cable you are using.
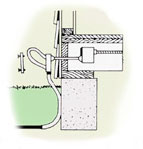
- Run conduit from the breaker box through the wall to where the weatherproof elbow will be mounted on the outside wall (see image).
- Continue the conduit down from the weatherproof elbow to where it bends, 18′ to 24′ below ground. Remember, conduit is generally required where the cable bends underground (see image).
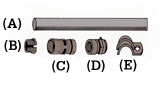
- Mount the conduit to the building foundation with conduit connectors (see image, part D).
- This image shows the components for wiring with conduits. (part A) shows the conduit itself. (part B) illustrates an adapter for attaching thin-walled conduit to rigid conduit. (part C) is a coupling for connecting two pieces of conduit. (part D) shows the connector used for attaching a piece of conduit to a weatherproof box. (part E) is the pipe strap you should use to fasten the conduit to the wall about every 6′ on exposed runs and about every 10′ on concealed runs.
- Your local code may require that the entire underground cable be covered with conduit. The main purpose of the conduit is to protect the cable from spading tools used in the yard.
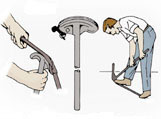
- This image shows a conduit bender and the proper method for inserting and bending thin-walled conduit. With care and practice, you will learn to bend conduit easily.
- Insert the cable through the weatherproof elbow, and then down through the conduit to the 18′ to 24′ level where it is to be buried. Pull the cable tightly through the weatherproof elbow and reattach the cover.
 Check your state and local codes before starting any project. Follow all safety precautions. Information in this document has been furnished by the National Retail Hardware Association (NRHA) and associated contributors. Every effort has been made to ensure accuracy and safety. Neither NRHA, any contributor nor the retailer can be held responsible for damages or injuries resulting from the use of the information in this document.
For home improvement advice, visit JS West Lumber & Ace Hardware Sonora, Ca. or visit www.acehardware.com and click on the Answers@Ace icon. Answers@Ace is an online resource with information for do-it-yourselfers about hardware and home improvement projects. The Everyday Projects section has pictures and detailed, step-by-step instructions for this and many more home improvement projects.
To speak to an Ace Hardware advisor in Sonora call: 209 532 7446.